
Looking for a travel coffee maker that’s compact, user-friendly, and brews a killer cup? The Aeropress Go might just steal your heart. This pint-sized powerhouse takes the brilliance of the original Aeropress and packs it into a tidy package, complete with a mug that doubles as a carrying case—something the original can’t boast. As someone who’s brewed with both, I was eager to see if the Go could live up to the hype. Spoiler: it’s a game-changer for coffee on the move.
What sets the Aeropress Go apart in the world of travel coffee makers? How does it compare to the original and other options out there? Let’s dive into this review and find out.
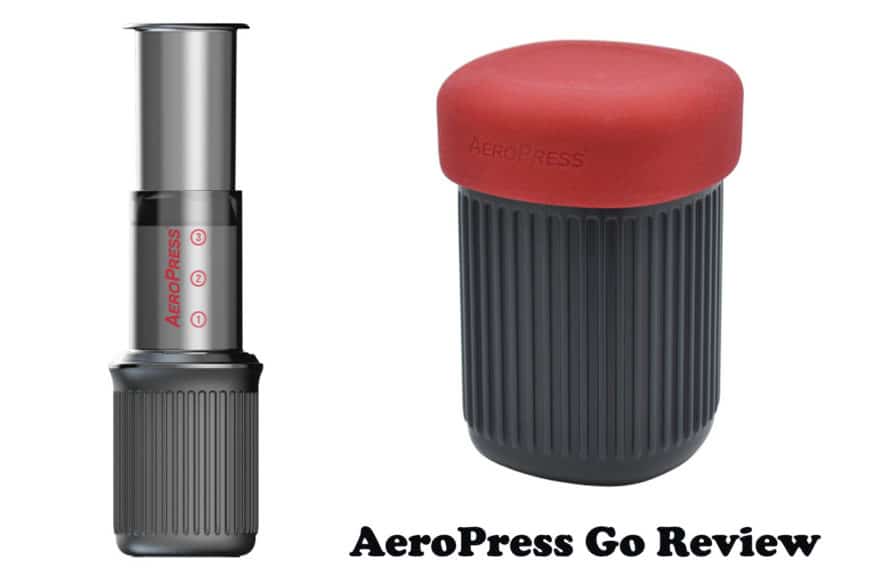
Design: Compact and Clever
If you know the original Aeropress, the Go feels like its sleek younger sibling. It’s about an inch shorter and a touch narrower, shaving the brew capacity from 10 ounces to 8 ounces. That’s a small price to pay for portability—8 ounces is still enough for a solid morning cup.
The real magic is how it all fits together. The brewing components nest inside a sturdy gray plastic mug, sealed with a red silicone lid. You’ll find a scoop, a foldable stir stick, and a slim case holding 20 paper filters tucked inside. Closed up, it’s lightweight, durable, and oddly adorable—think a coffee-making Toad from Super Mario. It slips easily into a backpack or suitcase, ready for any adventure.
Taste Test: Quality That Holds Up
To see how the Go performs, I brewed side-by-side cups with it and the original Aeropress using the same beans. Both delivered the smooth, rich coffee Aeropress is known for, but I noticed a slight twist: the Go’s brew leaned a bit brighter, with a touch more acidity. It wasn’t better or worse—just different, likely due to the smaller chamber affecting extraction. The quality was still top-notch, proving the Go doesn’t skimp on flavor despite its size.
Aeropress recommends brewing at 175°F for dark roasts (or 185°F for lighter ones), cooler than the typical 195–205°F for most methods. Curious about the difference, I tested 175°F against boiling water straight from the kettle—around 212°F—just to push the limits.
The 175°F cup was clean and refined, free of any burnt or smoky notes, like something you’d get at a fancy coffee shop. The 212°F brew, while still tasty, had sharper, rougher edges, hinting at over-extraction. It reminded me of a bold diner coffee—good, but less polished. Stick with the recommended range for the best results, but it’s fun to experiment.
Brewing Options: Your Coffee, Your Way
The Aeropress Go keeps things versatile with two main brewing methods. The standard approach is simple: scoop your grounds (I use 22 grams of a medium #6 grind), pour hot water to the second-to-last line, stir, and plunge. In about a minute, coffee drips into the mug below, ready to sip.
Then there’s the inverted method, which I’ve come to love for its control. You insert the plunger slightly, flip the brewer upside down, add grounds and water, stir, cap it, flip it back, and plunge. This lets you adjust steeping time, perfect for dialing in richer flavors. Whether you’re a no-fuss brewer or a tinkerer who tweaks every variable, the Go’s setup makes it easy to find your sweet spot.
Water Temp Comparison
To clarify the temperature test, here’s a quick table summarizing my findings:
| Water Temp | Aroma | Flavor Profile | Vibe |
|---|---|---|---|
| 175°F | Clean, no burnt notes | Smooth, refined | Upscale coffee shop |
| 212°F (boiling) | Smoky, bold | Sharp, slightly rough | Rustic diner |
The 175°F range is where the Go shines, but playing with hotter water can be a fun experiment if you’re curious.
Travel-Friendly? Absolutely
The Aeropress Go is built for the road, and it delivers. I tested it on a weekend work trip, and it outshone the original in every way. While the classic Aeropress comes with an optional tote bag, the Go’s mug-and-lid combo is more compact and less clunky. Post-brew, you can stash used parts in the mug to keep your workspace clean—a small detail that makes a big difference. Plus, it looks sharp on a counter or shelf, which doesn’t hurt.
Any downsides? A couple, but they’re minor. The folding stir stick is a space-saver but feels flimsier than the original’s paddle, making stirring less satisfying. The silicone lid can also be a bit wobbly when snapped on, though it stays secure. These quirks don’t detract from the Go’s travel-ready brilliance.
Final Thoughts: A Must-Have for Coffee Lovers
After brewing my way through plenty of cups, I’m sold on the Aeropress Go. It nails the balance of convenience, quality, and affordability—priced around $40, just like the original. Whether you’re camping, traveling, or brewing at home, it delivers a consistently great cup without fuss. Compared to other travel coffee makers, its portability and ease of use make it a standout.
For anyone searching for a reliable travel coffee maker, the Aeropress Go is a no-brainer. It’s not a complete reinvention of the original—just a smarter, more compact version that’s ready to go wherever you do. If you want to up your coffee game on the move, this little marvel deserves a spot in your bag.