
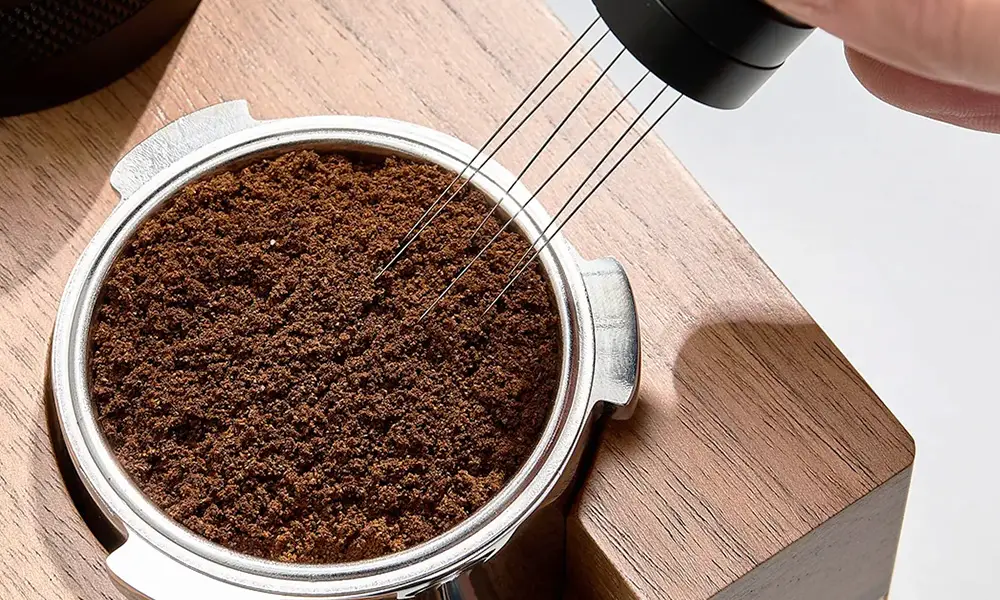
WDT, the Weiss Distribution Technique, means stirring the coffee grounds in your portafilter with a few very thin needles before you tamp. It breaks up clumps and evens out the coffee bed, so water flows through the puck evenly instead of rushing through weak spots. The result is fewer sour or bitter shots and more consistent espresso, and a basic WDT tool costs very little.
Here’s where WDT came from, why it works, how to do it step by step, and what to look for in a tool.
| Question | Short answer |
|---|---|
| What it stands for | Weiss Distribution Technique |
| Who invented it | John Weiss, a home espresso enthusiast, who shared it online in 2005 |
| What it does | Breaks up clumps and evens out the grounds before tamping |
| Main benefit | Less channeling, so more even, consistent extraction |
| Tool | A handle with several thin needles, about 0.25–0.4 mm |
| Time it adds | About 10–20 seconds per shot |
Where WDT Came From
WDT is named after John Weiss, a retired computer science professor with a background in biochemistry, not a coffee professional. Around 2004 he started stirring his espresso grounds with a single dissecting needle, using a cut-down yogurt cup as a funnel, and he shared the technique publicly in December 2005. It spread through home espresso forums and is now standard practice for home baristas and many cafes.
Today’s WDT tools are more refined, usually with several thin needles set in a handle, but the idea hasn’t changed: stir the grounds so the puck has an even density from edge to edge.
Why WDT Works
Espresso grinders, especially at home, often produce clumps. When you tamp a basket with clumps or uneven piles, some areas end up denser than others. Under 9 bars of pressure, water takes the easiest path through the looser spots. That’s called channeling, and it means part of the coffee gets over-extracted and bitter while the rest is under-extracted and sour.
Stirring with fine needles breaks up those clumps and spreads the grounds evenly, so the puck resists water the same way everywhere. That gives you a more even extraction, more consistent shots from one day to the next, and often room to grind a little finer without the shot falling apart. If your shots taste sour and bitter at the same time, uneven extraction is a likely culprit; our espresso troubleshooting guide covers the other causes.
WDT won’t fix everything. A grinder that can’t grind fine enough, stale beans or the wrong dose will still give you bad shots. But it removes one of the biggest sources of shot-to-shot variation for almost no cost.
How to Do WDT
WDT in six steps
Adds about 10–20 seconds to each shot
- Grind into the portafilter with a dosing funnel on top so grounds don’t spill over the edge.
- Push the needles to the bottom of the basket, holding the tool upright.
- Stir in small circles, working out to the edges and back, for about 10–15 seconds.
- Finish with a few gentle stirs near the surface to level the top.
- Check that the bed looks even, with no mounds, gaps or bare spots at the edges.
- Tamp level and firmly, then pull the shot as usual.
There’s no single correct stirring pattern, and people still debate the details. What matters is reaching the bottom of the basket, covering the whole bed and being consistent from shot to shot. For tamping, a level puck matters more than force: press firmly until the coffee stops compressing, the same way each time. Our guide to home espresso machines walks through the full shot routine.
Common WDT Mistakes
Clumps sit at the bottom too. Get the needles all the way down.
Thick needles or a paperclip can leave holes and push grounds around instead of breaking up clumps.
Banging the portafilter can undo your work by shifting grounds to one side. A gentle settle is enough.
Without a dosing funnel, stirring flicks grounds onto the counter and changes your dose.
WDT evens out distribution, but it can’t fix stale beans or a grind that’s far too coarse.
Choosing a WDT Tool
You don’t need an expensive tool. Look for:
- Thin needles, about 0.25–0.4 mm. Most good tools use several acupuncture-style needles.
- Enough needles to work quickly, usually 6–10. More needles cover the bed faster, though very dense tools can feel awkward.
- Needles long enough to reach the bottom of your basket.
- A comfortable handle and, ideally, a stand that keeps the needles clean between shots.
Spring-loaded and stand-mounted tools are a nice upgrade, but a simple handle with fine needles works just as well. Don’t confuse WDT tools with wedge-style coffee distributors, which only level the surface of the bed.
You can compare WDT tools for espresso and espresso dosing funnels on Amazon. As an Amazon Associate, Craft Coffee Guru earns from qualifying purchases.
Pair WDT with RDT
RDT, the Ross Droplet Technique, tackles static before you grind. Add a single spritz of water, or stir a damp spoon handle through one dose of beans, and the grounds stop clinging to the grinder and clumping. Do it right before grinding, one dose at a time, and never wet beans that sit in a hopper. Together, RDT and WDT give you a clean, even puck. A good burr grinder and a coffee scale round out the setup.
WDT FAQ
Is WDT worth it?
For most home espresso setups, yes. It costs little, takes seconds and makes shots noticeably more consistent, especially with grinders that clump.
Can I use a paperclip or toothpick?
In a pinch, but they’re thicker than proper WDT needles, so they move grounds around more than they break up clumps. A dedicated tool with fine needles works better.
Do I still need to tamp after WDT?
Yes. WDT evens out the grounds; tamping compresses them into a solid, level puck. You need both.
Source: Daily Coffee News interview with John Weiss.

Former roastery owner and coffee tour operator. Steve spent five years roasting coffee for his own shop and wholesale customers. More about Steve