
To roast coffee at home, you heat green (unroasted) coffee beans until they turn brown and start to crack, stop at the roast level you want, cool them quickly and let them rest for a day or more before brewing. A hot-air popcorn popper is enough to start, and a batch takes about 8 to 15 minutes. You get the freshest coffee possible, green beans cost less per pound than good roasted coffee, and you can roast coffees you would never find on a store shelf.
| Roast time | About 8 to 15 minutes, depending on the roaster |
| First crack | Beans pop like popcorn at about 385 to 400°F (196 to 205°C) |
| Light roast | Stop 1 to 2 minutes after first crack begins |
| Medium roast | Stop after first crack ends, before second crack |
| Dark roast | Stop at the first snaps of second crack, around 435°F (224°C) |
| Weight loss | About 13 to 20 percent; more for darker roasts |
| Cooling | As fast as possible, ideally to room temperature in about 4 minutes |
| Rest | At least 24 hours before brewing; often better after a few days |
Temperatures are bean temperatures. Most home roasters and poppers cannot measure them, so you will go by sound, color and smell.
What You Need
- Green coffee. Buy from a supplier that sells to home roasters, such as Sweet Maria’s. Green coffee keeps for months if stored cool and dry. For your first roasts, choose a washed coffee from Colombia, Guatemala or Brazil; they roast evenly and forgive mistakes.
- A roaster. A popcorn popper, a stovetop pan or a dedicated home roaster (see below).
- A metal colander or two for cooling, and a bowl to catch chaff, the papery skin that flies off during roasting.
- A kitchen scale and a timer, so you can repeat a roast you like.
- Ventilation. Roasting makes smoke, especially darker roasts. Roast outdoors, by an open window, or under a strong range hood.
- A notebook for your roast log.
Choosing a Roasting Method
| Method | Batch size | Good | Not so good |
|---|---|---|---|
| Hot-air popcorn popper | About 60 to 90 g | Cheap, fast, easy to see and hear the beans | Tiny batches, little control, can overheat; voids the popper’s warranty |
| Stovetop pan or crank popcorn pot | About 100 to 250 g | Uses what you have; hands-on | Needs constant stirring; easy to scorch; uneven |
| Oven | Up to about 250 g | No special gear | Least even; hard to see or hear the roast. Not recommended |
| Fluid-bed home roaster (such as Fresh Roast) | About 100 to 250 g | Even, quick, adjustable heat and fan | Smaller batches than drum roasters |
| Drum home roaster (such as Behmor or Gene Café) | About 250 to 450 g | Bigger batches, more control, built-in smoke and chaff handling on some | More expensive; slower to learn |
Batch sizes are typical ranges. Always follow the manufacturer’s maximum for a dedicated roaster.
If you use a popcorn popper, it must be a hot-air model with vents on the side of the chamber, not one with a mesh screen at the bottom, where chaff can fall onto the heating element.
How to Roast Coffee, Step by Step
Your first roast
Written for a popcorn popper or a fluid-bed roaster, where you can watch the beans. A drum roaster follows the same stages, just more slowly. Never leave a roast unattended.
- Set up. Work outdoors or under a hood, with a bowl to catch chaff and your colander ready.
- Weigh the green coffee. Use the amount your roaster recommends. In a popper, the beans should still be able to swirl freely.
- Start the heat and the timer.
- Drying. The beans turn from green to pale yellow and smell grassy, like hay.
- Browning. They go tan, then light brown, and smell like toast or baking bread. Chaff starts to fly.
- First crack. You hear popping, like popcorn. In a popper this usually comes around 4 to 7 minutes in; note the time.
- Choose when to stop. For a light roast, 1 to 2 minutes after first crack starts. For medium, after first crack has finished. For dark, at the first quiet, rapid crackles of second crack.
- Cool fast. Dump the beans into the colander and shake or toss them, ideally between two colanders or in front of a fan, until they are cool to the touch.
- Remove the chaff and weigh. Blow or shake off the last chaff outdoors, then weigh the roasted beans to see how much weight they lost.
- Rest. Leave the beans in a container that is not fully sealed for the first several hours, or in a bag with a one-way valve, then brew after at least a day.
The Stages of a Roast
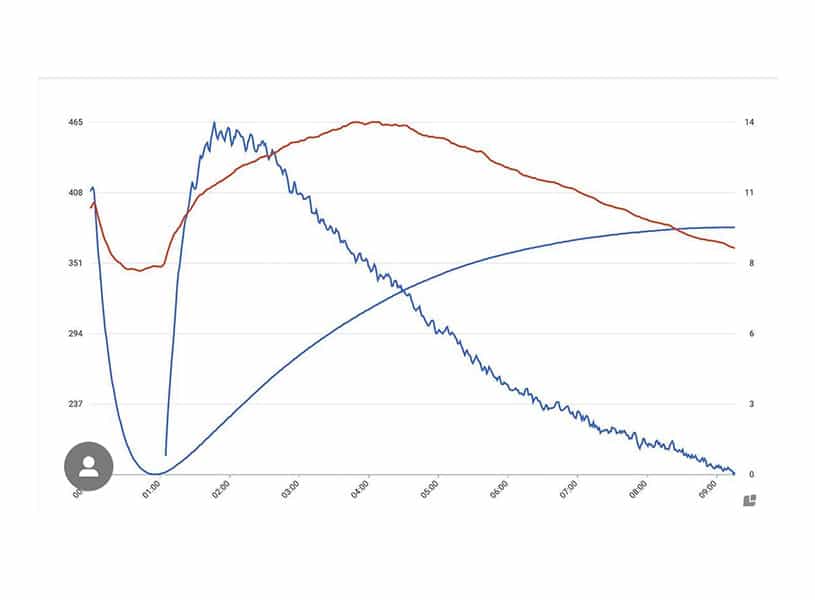
| Stage | What you see | What you smell or hear |
|---|---|---|
| Drying | Green turns pale yellow | Grass, hay |
| Browning | Yellow to tan to light brown | Toast, baking bread, then caramel |
| First crack | Beans swell noticeably; chaff flies | Loud pops, like popcorn |
| Development | Color deepens evenly | Sweet, caramel, roasted |
| Second crack | Oil starts to show; smoke increases | Quieter, rapid crackling, like cereal in milk |
| Past second crack | Very dark and oily | Heavy smoke; burnt. Stop before this |
During browning, sugars and amino acids react (the Maillard reaction) and sugars caramelize, creating most of coffee’s flavor. The time between the start of first crack and the end of the roast is called development. Many roasters aim for development to be roughly 15 to 25 percent of the total roast time; much less tends to taste grassy and sour, much more tends to taste flat and roasty.
Roast Levels: When to Stop
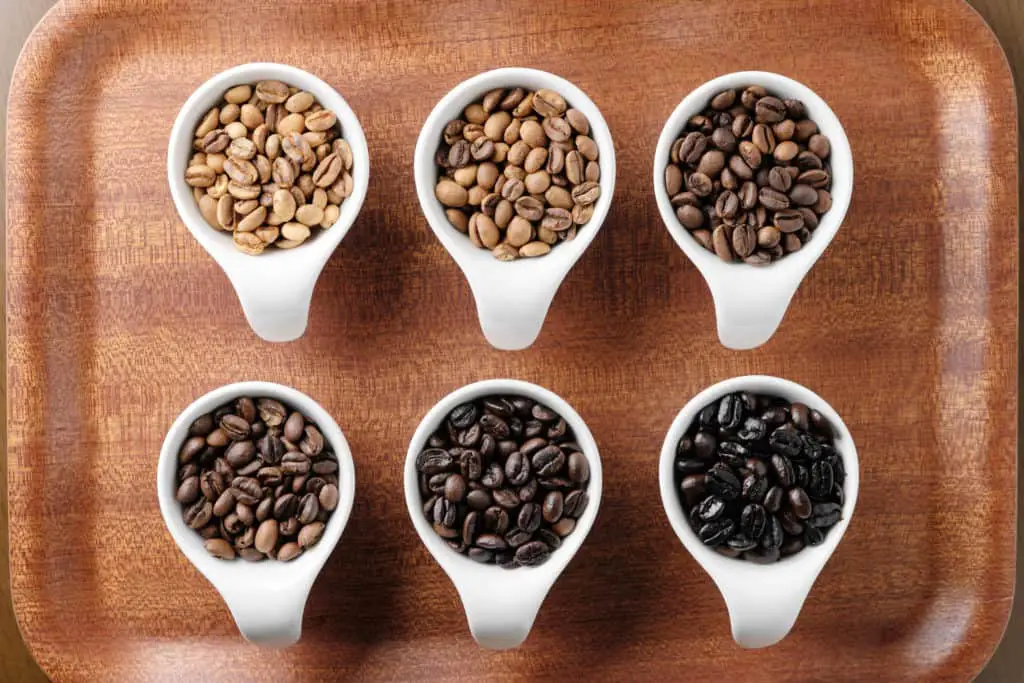
Lighter roasts keep more of the coffee’s origin character: fruit, florals and brighter acidity. Medium roasts add sweetness and body. Dark roasts taste mostly of the roast itself. For your first few batches, aim for a medium roast, stopping after first crack has finished. It is the easiest to judge and the most forgiving. Our guide to coffee roast levels describes each level and how it tastes.
Common Beginner Mistakes
- Stopping too soon after first crack. The coffee tastes grassy, peanutty and sour. Let it develop a little longer next time.
- Too much heat, too fast. Beans get dark spots or burnt tips (scorching and tipping) and taste ashy.
- A roast that stalls. If the heat drops and the roast drags on, the coffee tastes flat and bready (baked).
- Overfilling the roaster. Beans do not move enough and roast unevenly.
- Cooling too slowly. The beans keep roasting in their own heat and end up darker than you meant.
Our guide to coffee defects shows what each of these looks and tastes like. Pale, unripe beans (quakers) are normal in home roasting; pick them out after cooling.
Resting and Storing Your Roast
Freshly roasted coffee gives off carbon dioxide for several days. Brewed too soon, it can taste sharp and uneven, and it bubbles hard when you brew it. Give it at least 24 hours. Most home roasts taste best after a few days; light roasts and coffee for espresso often need longer. After that, keep the beans whole in an airtight container away from heat and light, and use them within about 2 to 4 weeks. Our guide to storing coffee beans has rest times by roast level.
Keep a Roast Log
The fastest way to improve is to write down every roast and taste the results side by side. For each batch, note:
- The coffee and the green weight
- When the beans turned yellow, when first crack started, and when you stopped
- The roasted weight (and the percentage lost)
- How it tasted after resting
Then change one thing at a time, such as stopping 30 seconds later, and compare. Cupping two roasts of the same coffee side by side is the clearest way to taste the difference.
Safety
- Never leave a roast unattended. Chaff is flammable, and beans can catch fire if a roast runs too long.
- Keep a lid or fire extinguisher nearby, and roast away from curtains and anything that can burn.
- Roast with good ventilation; dark roasts make a lot of smoke.
- Let a popcorn popper cool completely between batches, and do not run it longer than it is built for.
- The beans, roaster and colander get very hot. Keep children and pets away.
Former roastery owner and coffee tour operator. Steve spent five years roasting coffee for his own shop and wholesale customers. More about Steve