

The Chemex coffee brewer is a favorite at coffee shops and homes alike, and it’s easy to see why. This sleek, hourglass-shaped pour-over maker brews a clean, flavorful cup while doubling as a stylish centerpiece. Whether you’re brewing for yourself or hosting friends, the Chemex delivers. In this guide, we’ll walk you through the step-by-step process to brew coffee with a Chemex, share tips for getting it right every time, and explain why this brewer is a must-have for coffee lovers.
Why Choose a Chemex?
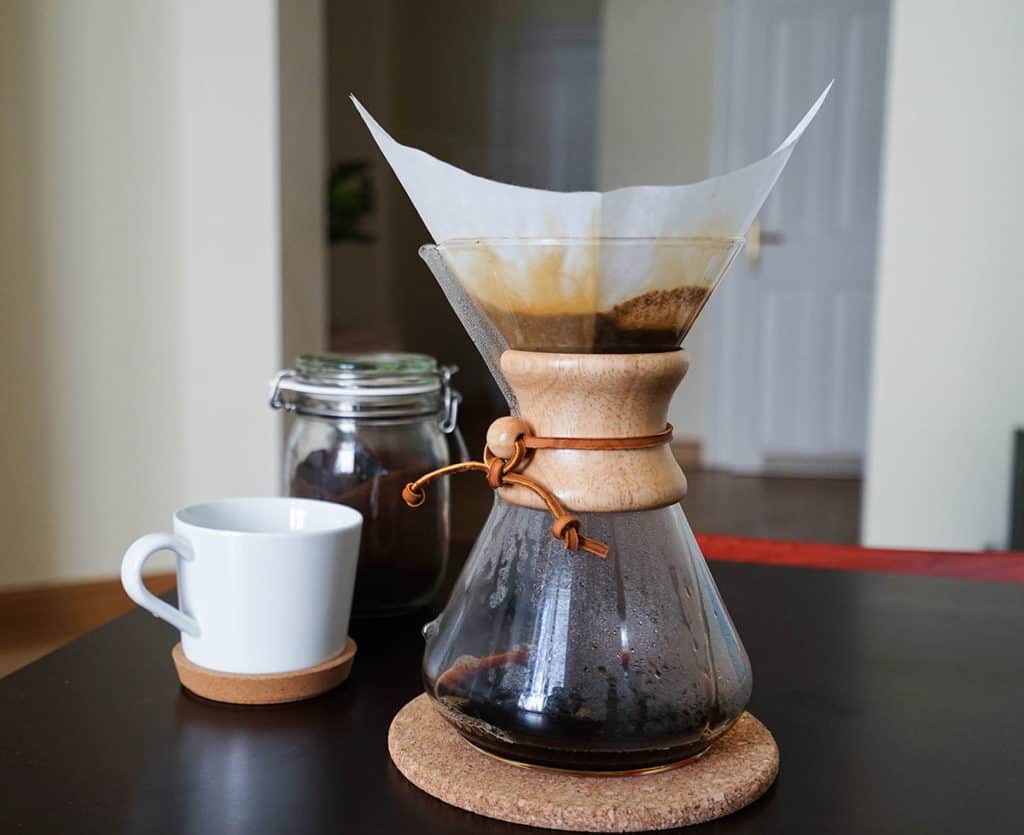
The Chemex, invented in 1941 by chemist Peter Schlumbohm, combines form and function. Its thick paper filters remove oils and sediment, producing a bright, clean cup with nuanced flavors—perfect for highlighting single-origin beans.
Its elegant design earned it a spot in the Museum of Modern Art (MoMA) and recognition as one of the best-designed products of the 20th century by the Illinois Institute of Technology. Available in sizes from 3 to 13 cups, the 8-cup model is versatile for solo brews or gatherings. Plus, it’s simple to use and sparks conversation when displayed on your table.
What You’ll Need
Before brewing, gather these essentials. Most are one-time purchases, and brewing at home saves money compared to café prices.
- 8-Cup Chemex: This size handles single cups or group servings. Check Amazon or specialty retailers for prices and options.
- Chemex Filters: Thicker than standard filters, these trifold papers remove unwanted oils. Unfold them with three layers against the pour spout for best results.
- Fresh Roasted Coffee: Choose beans roasted within two weeks, ideally from a local roaster or a subscription service, for maximum flavor.
- Burr Grinder: Manual or electric, a burr grinder ensures a consistent medium-coarse grind, similar to kosher salt.
- Scale: A scale ensures precise coffee-to-water ratios, critical for balanced flavor. See our guide on why scales matter for coffee brewing.
- Gooseneck Kettle: Its narrow spout allows controlled pouring, preventing uneven extraction.
- Timer: Use your phone or a dedicated timer to track brewing time and avoid over- or under-extraction.
- Stir Stick or Spoon: A small tool to gently agitate grounds for even saturation.
Step-by-Step Guide to Brewing with a Chemex
Follow these steps for a perfect Chemex brew. We’ll use a 16:1 water-to-coffee ratio (400g water to 25g coffee) for a single 12-ounce cup, but you can adjust to taste.
Step 1: Heat the Water
Fill your gooseneck kettle with filtered water and heat it to 195–205°F (90–96°C). If you don’t have a thermometer, bring it to a boil and let it cool for 30 seconds. While the water heats, prep the other steps.
Step 2: Set Up the Filter
Place a Chemex filter in the brewer, ensuring the three-layer side sits against the pour spout. Pour hot water through the filter to rinse it, removing any paper taste and preheating the Chemex. Dump the rinse water by tilting the Chemex while holding the filter in place.
Step 3: Weigh and Grind the Coffee
Weigh 25g of fresh coffee beans on your scale, taring it to zero first. Grind the beans to a medium-coarse consistency, like kosher salt. If the coffee tastes bitter, your grind is too fine (over-extracted); if it’s sour, it’s too coarse (under-extracted). Adjust as needed.
Step 4: Start the Bloom
Place the Chemex with the rinsed filter on the scale and add the ground coffee. Tare the scale again. Start your timer and slowly pour 75g of hot water over the grounds in a circular motion, saturating them evenly. Gently stir with a spoon to ensure no dry spots remain. Wait 30 seconds for the “bloom,” when fresh coffee releases CO2, creating bubbles. No bloom? Your beans may not be fresh.
Step 5: Pour the Remaining Water
At the 30-second mark, begin pouring water in a slow, clockwise or counterclockwise spiral, moving from the center outward. Add water until the slurry reaches just below the Chemex’s rim, then pause. As the water level drops, continue pouring until you hit 400g total. This should take about 1 minute, reaching the 1:30 mark on your timer. Aim for a total brew time of 3:30–4:00 minutes.
Step 6: Finish and Serve
When the timer hits 4 minutes, lift the filter and grounds, letting them drip briefly over the Chemex. Discard the filter in the sink or compost. Swirl the Chemex gently to mix the coffee, then pour it into your favorite mug. Sip slowly and enjoy the evolving flavors as it cools—fresh coffee often reveals new notes at different temperatures.
Coffee-to-Water Ratios for Chemex
The 16:1 ratio (16g water per 1g coffee) is a great starting point, but you can tweak it to suit your taste. Here’s a table comparing common ratios and their flavor profiles:
☕ Chemex Coffee to Water Ratios
| Coffee Amount | Water Amount | Ratio | Strength | Servings |
|---|---|---|---|---|
| 25g (3.5 tbsp) | 400ml (13.5 fl oz) | 1:16 | Mild | 2 cups |
| 30g (4 tbsp) | 480ml (16 fl oz) | 1:16 | Mild | 2-3 cups |
| 35g (5 tbsp) | 525ml (17.5 fl oz) | 1:15 | Medium | 3 cups |
| 40g (5.5 tbsp) | 600ml (20 fl oz) | 1:15 | Medium | 3-4 cups |
| 45g (6.5 tbsp) | 630ml (21 fl oz) | 1:14 | Strong | 4 cups |
| 50g (7 tbsp) | 700ml (23.5 fl oz) | 1:14 | Strong | 4-5 cups |
This table helps you choose a ratio based on your preferred strength, making it easier to experiment.
Tips for Chemex Success
- Use Fresh Beans: Beans roasted within 14 days offer the best flavor. Store them in an airtight container at room temperature, not the freezer (see our coffee storage guide).
- Water Quality Matters: Filtered water enhances taste by removing impurities. Avoid tap water with strong chlorine or mineral content.
- Grind Consistency: A burr grinder prevents uneven extraction, unlike blade grinders, which produce inconsistent particles.
- Control Pour Speed: Pour slowly and steadily to avoid channeling, where water bypasses some grounds, leading to weak flavor.
- Clean Regularly: Wash the Chemex with soap and water after each use. For stubborn stains, soak with a vinegar-water mix and rinse thoroughly.
- Experiment: Try different beans (e.g., Ethiopian for fruity notes, Colombian for nutty) or ratios to find your perfect cup.
Troubleshooting Common Issues
- Bitter Coffee: Grind coarser or reduce brew time to avoid over-extraction.
- Sour Coffee: Grind finer or extend brew time for better extraction.
- Weak Flavor: Increase coffee dose (e.g., try a 15:1 ratio) or ensure even pouring.
- Slow Drip: Check that the filter is positioned correctly and not clogged. Use a medium-coarse grind to prevent fines from slowing drainage.
Watch and Learn
If you’re a visual learner, check out this Chemex brewing video for a clear demonstration. It may not match our exact process but offers a helpful starting point.
Why the Chemex Shines
The Chemex stands out for its simplicity and versatility. It brews as little as one cup or enough for a group, making it ideal for solo mornings or social gatherings. Its clean design invites conversation, and the hands-on process connects you to your coffee. Unlike drip machines, it gives you control over every variable—grind, pour, time—letting you craft a cup tailored to your taste.
Final Thoughts
Brewing with a Chemex is more than a routine—it’s a ritual that rewards attention to detail with a stellar cup of coffee. Its elegant design and clean flavor make it a favorite for beginners and enthusiasts alike. Whether you’re sipping solo or sharing with friends, the Chemex delivers a pour-over experience that’s hard to beat. Grab your brewer, experiment with ratios, and savor the results.